使用 ONNX Runtime 在 AzureML 上部署高效能問答模型
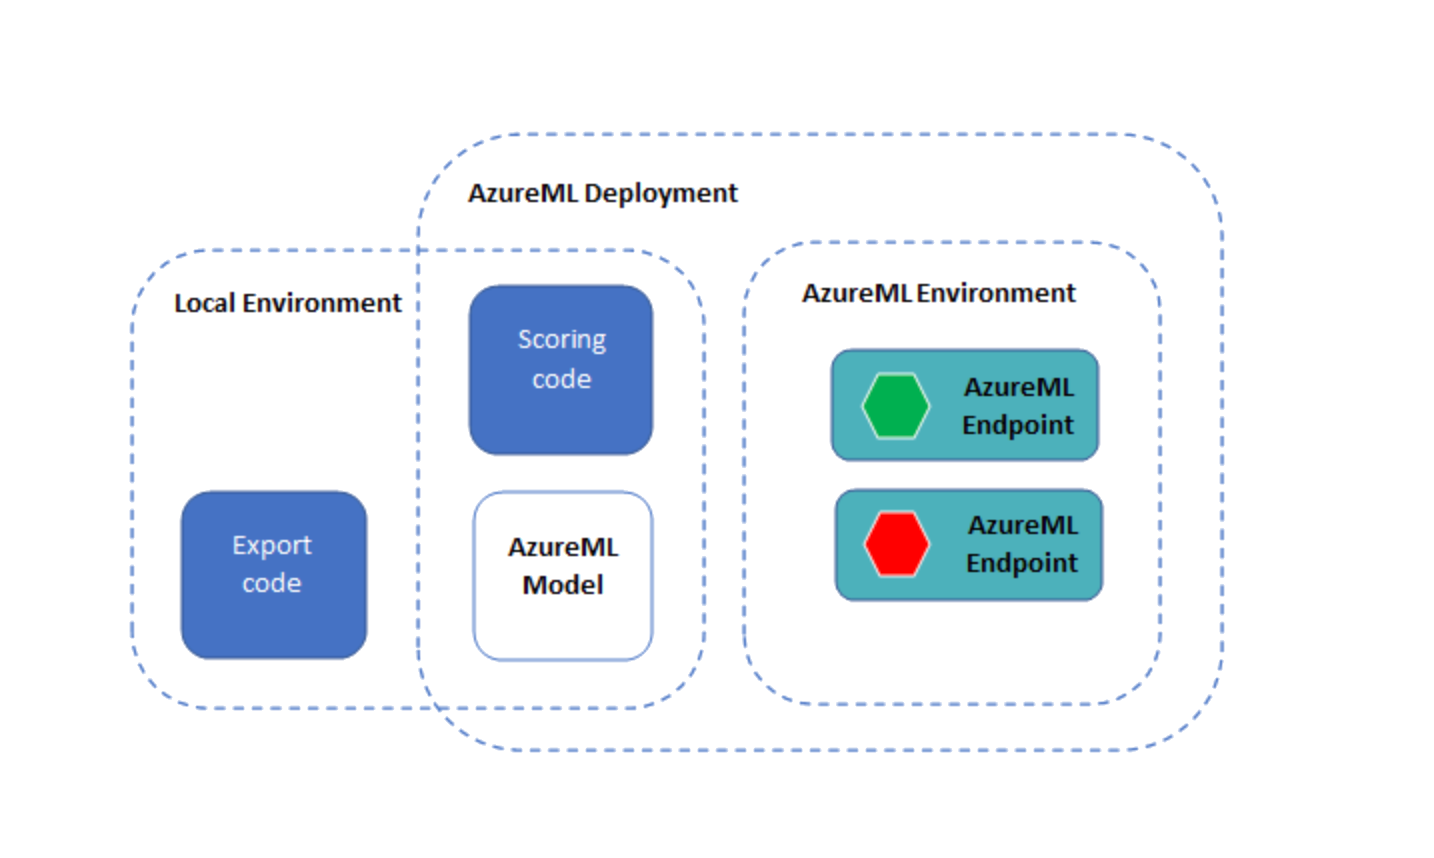
本教程獲取一個 HuggingFace 的 BERT 模型,將其轉換為 ONNX 格式,並透過 AzureML 使用 ONNX Runtime 部署 ONNX 模型。
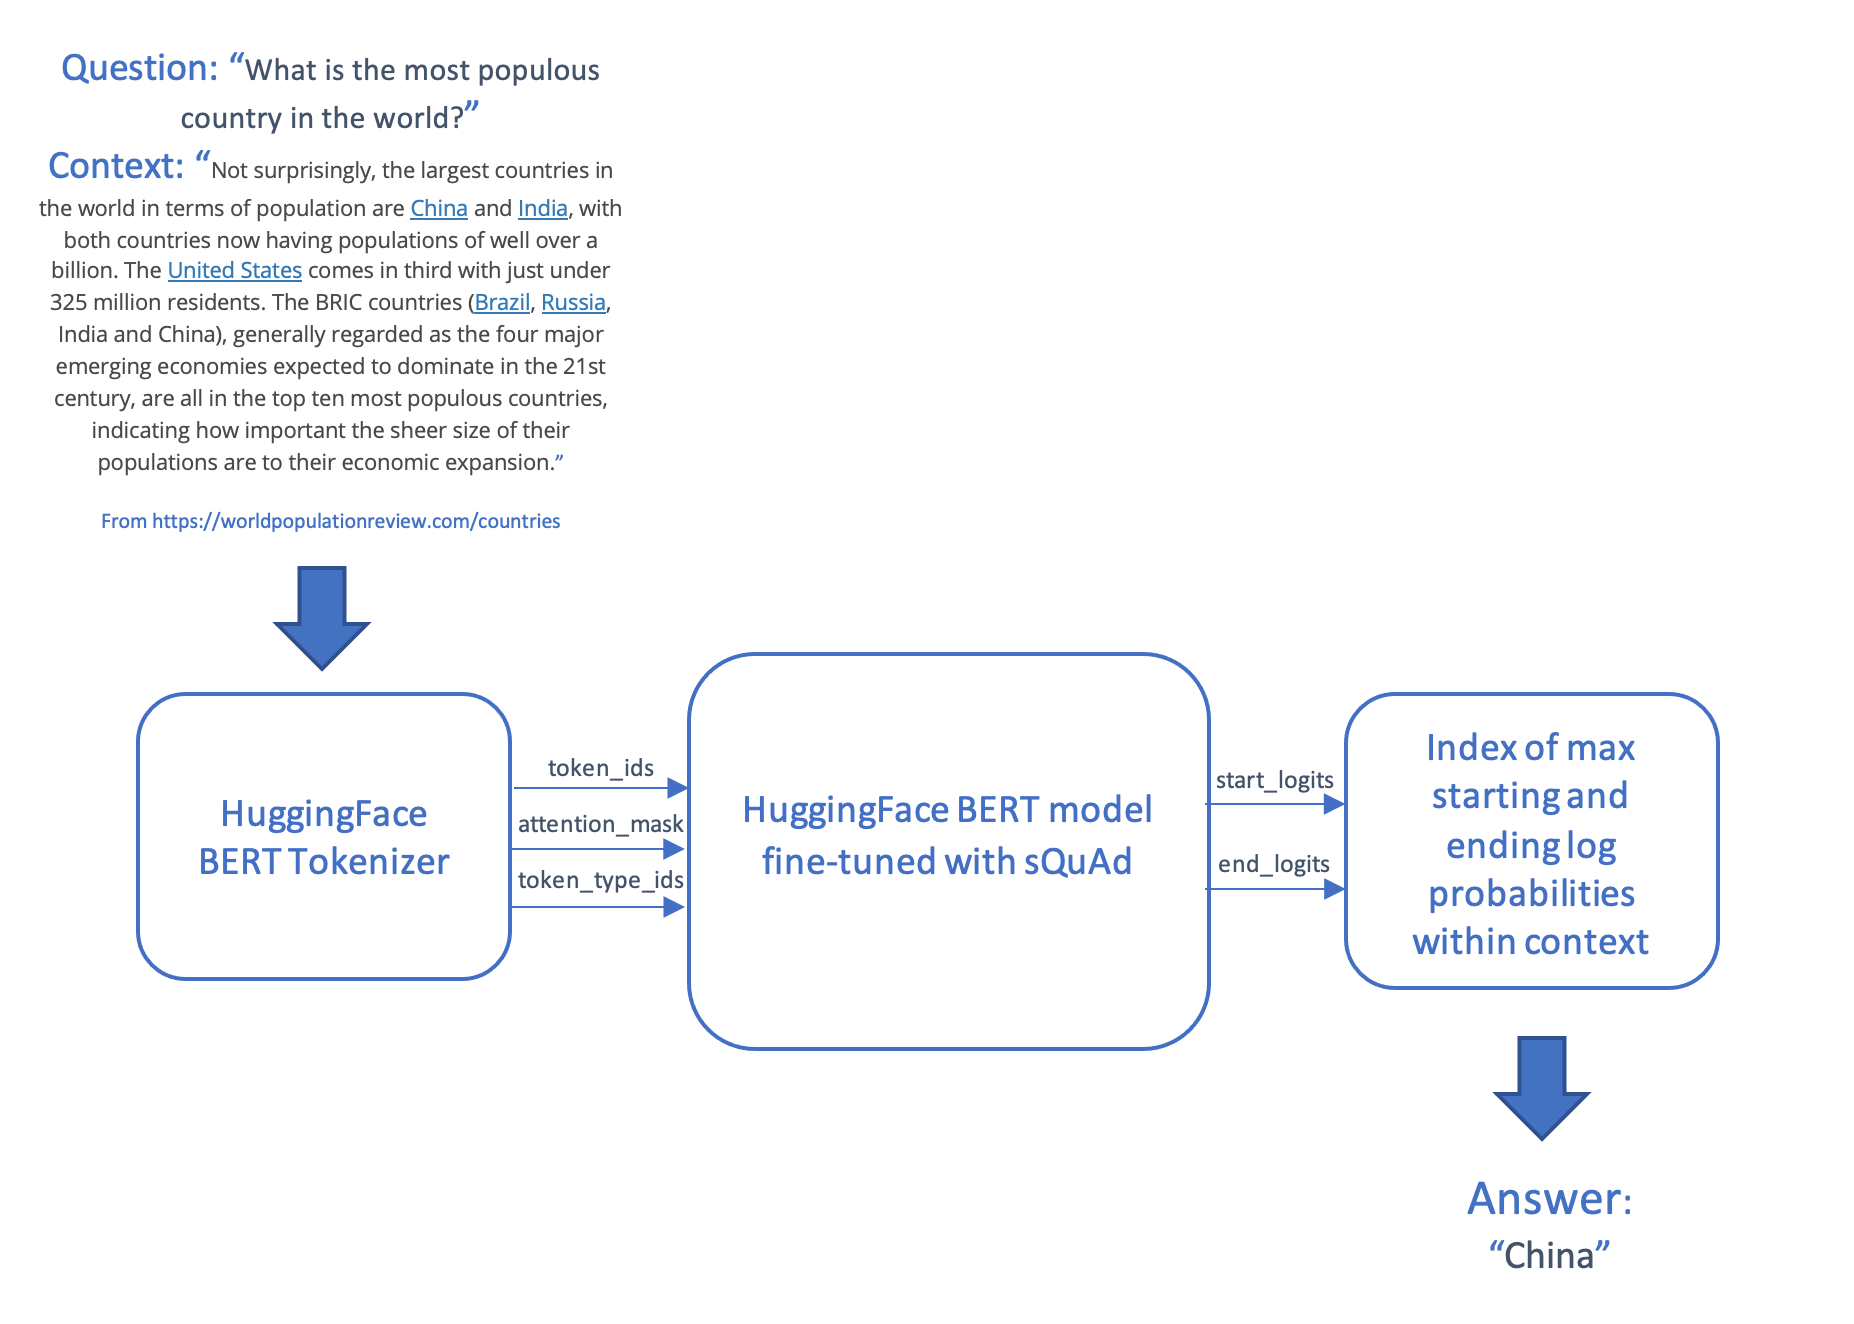
在以下章節中,我們以使用 Stanford Question Answering Dataset (SQuAD) 資料集訓練的 HuggingFace BERT 模型為例。您也可以訓練或微調自己的問答模型。
問答場景接收一個問題和一段文字(稱為上下文),並生成答案,答案是從上下文中提取的一段文字。此場景對問題和上下文進行分詞和編碼,將輸入饋送到 transformer 模型,並透過在上下文中生成最可能起始和結束標記來生成答案,然後將這些標記映射回單詞。
然後,模型和評分程式碼透過 AzureML 使用線上端點進行部署。
目錄
先決條件
本教程的原始碼已釋出在 GitHub 上。
要在 AzureML 上執行,您需要
- 一個 Azure 訂閱
- 一個 Azure 機器學習工作區(如果您還沒有,請參閱AzureML 配置筆記本來建立工作區)
- Azure 機器學習 SDK
- Azure CLI 和 Azure 機器學習 CLI 擴充套件(> 版本 2.2.2)
您可能還會發現以下資源有用
如果您沒有 AzureML 訂閱的訪問許可權,您可以在本地執行本教程。
環境
要直接安裝依賴項,請執行以下命令
pip install torch
pip install transformers
pip install azureml azureml.core
pip install onnxruntime
pip install matplotlib
要從您的 conda 環境建立 Jupyter 核心,請執行以下命令。將
conda install -c anaconda ipykernel
python -m ipykernel install --user --name=<kernel name>
安裝 AzureML CLI 擴充套件,此擴充套件將在下面的部署步驟中使用
az login
az extension add --name ml
# Remove the azure-cli-ml extension if it is installed, as it is not compatible with the az ml extension
az extension remove azure-cli-ml
獲取 PyTorch 模型並轉換為 ONNX 格式
在下面的程式碼中,我們從 HuggingFace 獲取一個使用 SQUAD 資料集微調的 BERT 模型,用於問答。
如果您想從頭開始預訓練 BERT 模型,請按照預訓練 BERT 模型中的說明操作。如果您想使用自己的資料集微調模型,請參考AzureML BERT Eval Squad 或 AzureML BERT Eval GLUE。
匯出模型
使用 PyTorch ONNX 匯出器建立一個 ONNX 格式的模型,以便與 ONNX Runtime 一起執行。
import torch
from transformers import BertForQuestionAnswering

model_name = "bert-large-uncased-whole-word-masking-finetuned-squad"
model_path = "./" + model_name + ".onnx"
model = BertForQuestionAnswering.from_pretrained(model_name)

# set the model to inference mode
# It is important to call torch_model.eval() or torch_model.train(False) before exporting the model,
# to turn the model to inference mode. This is required since operators like dropout or batchnorm
# behave differently in inference and training mode.
model.eval()

# Generate dummy inputs to the model. Adjust if necessary
inputs = {
        'input_ids':   torch.randint(32, [1, 32], dtype=torch.long), # list of numerical ids for the tokenized text
        'attention_mask': torch.ones([1, 32], dtype=torch.long),     # dummy list of ones
        'token_type_ids':  torch.ones([1, 32], dtype=torch.long)     # dummy list of ones
    }

symbolic_names = {0: 'batch_size', 1: 'max_seq_len'}
torch.onnx.export(model,                                         # model being run
                  (inputs['input_ids'],
                   inputs['attention_mask'],
                   inputs['token_type_ids']),                    # model input (or a tuple for multiple inputs)
                  model_path,                                    # where to save the model (can be a file or file-like object)
                  opset_version=11,                              # the ONNX version to export the model to
                  do_constant_folding=True,                      # whether to execute constant folding for optimization
                  input_names=['input_ids',
                               'input_mask',
                               'segment_ids'],                   # the model's input names
                  output_names=['start_logits', "end_logits"],   # the model's output names
                  dynamic_axes={'input_ids': symbolic_names,
                                'input_mask' : symbolic_names,
                                'segment_ids' : symbolic_names,
                                'start_logits' : symbolic_names,
                                'end_logits': symbolic_names})   # variable length axes
使用 ONNX Runtime 執行 ONNX 模型
以下程式碼使用 ONNX Runtime 執行 ONNX 模型。您可以在部署到 Azure 機器學習之前在本地進行測試。
init() 函式在啟動時呼叫,執行一次性操作,例如建立分詞器和 ONNX Runtime 會話。
run() 函式在我們使用 Azure ML 端點執行模型時呼叫。新增必要的 preprocess() 和 postprocess() 步驟。
為了進行本地測試和比較,您也可以執行 PyTorch 模型。
import os
import logging
import json
import numpy as np
import onnxruntime
import transformers
import torch

# The pre process function take a question and a context, and generates the tensor inputs to the model:
# - input_ids: the words in the question encoded as integers
# - attention_mask: not used in this model
# - token_type_ids: a list of 0s and 1s that distinguish between the words of the question and the words of the context
# This function also returns the words contained in the question and the context, so that the answer can be decoded into a phrase.
def preprocess(question, context):
    encoded_input = tokenizer(question, context)
    tokens = tokenizer.convert_ids_to_tokens(encoded_input.input_ids)
    return (encoded_input.input_ids, encoded_input.attention_mask, encoded_input.token_type_ids, tokens)

# The post process function maps the list of start and end log probabilities onto a text answer, using the text tokens from the question
# and context.
def postprocess(tokens, start, end):
    results = {}
    answer_start = np.argmax(start)
    answer_end = np.argmax(end)
    if answer_end >= answer_start:
        answer = tokens[answer_start]
        for i in range(answer_start+1, answer_end+1):
            if tokens[i][0:2] == "##":
                answer += tokens[i][2:]
            else:
                answer += " " + tokens[i]
        results['answer'] = answer.capitalize()
    else:
        results['error'] = "I am unable to find the answer to this question. Can you please ask another question?"
    return results

# Perform the one-off initialization for the prediction. The init code is run once when the endpoint is setup.
def init():
    global tokenizer, session, model

    model_name = "bert-large-uncased-whole-word-masking-finetuned-squad"
    model = transformers.BertForQuestionAnswering.from_pretrained(model_name)

    # use AZUREML_MODEL_DIR to get your deployed model(s). If multiple models are deployed,
    # model_path = os.path.join(os.getenv('AZUREML_MODEL_DIR'), '$MODEL_NAME/$VERSION/$MODEL_FILE_NAME')
    model_dir = os.getenv('AZUREML_MODEL_DIR')
    if model_dir == None:
        model_dir = "./"
    model_path = os.path.join(model_dir, model_name + ".onnx")

    # Create the tokenizer
    tokenizer = transformers.BertTokenizer.from_pretrained(model_name)

    # Create an ONNX Runtime session to run the ONNX model
    session = onnxruntime.InferenceSession(model_path, providers=["CPUExecutionProvider"])


# Run the PyTorch model, for functional and performance comparison
def run_pytorch(raw_data):
    inputs = json.loads(raw_data)

    model.eval()

    logging.info("Question:", inputs["question"])
    logging.info("Context: ", inputs["context"])

    input_ids, input_mask, segment_ids, tokens = preprocess(inputs["question"], inputs["context"])
    model_outputs = model(torch.tensor([input_ids]),  token_type_ids=torch.tensor([segment_ids]))
    return postprocess(tokens, model_outputs.start_logits.detach().numpy(), model_outputs.end_logits.detach().numpy())

# Run the ONNX model with ONNX Runtime
def run(raw_data):
    logging.info("Request received")
    inputs = json.loads(raw_data)
    logging.info(inputs)

    # Preprocess the question and context into tokenized ids
    input_ids, input_mask, segment_ids, tokens = preprocess(inputs["question"], inputs["context"])
    logging.info("Running inference")

    # Format the inputs for ONNX Runtime
    model_inputs = {
        'input_ids':   [input_ids],
        'input_mask':  [input_mask],
        'segment_ids': [segment_ids]
        }

    outputs = session.run(['start_logits', 'end_logits'], model_inputs)
    logging.info("Post-processing")

    # Post process the output of the model into an answer (or an error if the question could not be answered)
    results = postprocess(tokens, outputs[0], outputs[1])
    logging.info(results)
    return results


if __name__ == '__main__':
    init()

    input = "{\"question\": \"What is Dolly Parton's middle name?\", \"context\": \"Dolly Rebecca Parton is an American singer-songwriter\"}"

    run_pytorch(input)
    print(run(input))
透過 AzureML 使用 ONNX Runtime 部署模型
現在我們已經有了 ONNX 模型和使用 ONNX Runtime 執行它的程式碼,我們可以使用 Azure ML 部署它。
檢查您的環境
import azureml.core
import onnxruntime
import torch
import transformers

print("Transformers version: ", transformers.__version__)
torch_version = torch.__version__
print("Torch (ONNX exporter) version: ", torch_version)
print("Azure SDK version:", azureml.core.VERSION)
print("ONNX Runtime version: ", onnxruntime.__version__)
載入您的 Azure ML 工作區
我們首先從之前在配置筆記本中建立的現有工作區例項化一個工作區物件。
請注意,以下程式碼假定您的筆記本所在的目錄或子目錄 .azureml 中包含一個 config.json 檔案,其中包含訂閱資訊。您也可以使用 Workspace.get() 方法顯式提供工作區名稱、訂閱名稱和資源組。
import os
from azureml.core import Workspace

ws = Workspace.from_config()
print(ws.name, ws.location, ws.resource_group, ws.subscription_id, sep = '\n')
Register your model with Azure ML
Now we upload the model and register it in the workspace.

from azureml.core.model import Model

model = Model.register(model_path = model_path,                 # Name of the registered model in your workspace.
                       model_name = model_name,            # Local ONNX model to upload and register as a model
                       model_framework=Model.Framework.ONNX ,   # Framework used to create the model.
                       model_framework_version=torch_version,   # Version of ONNX used to create the model.
                       tags = {"onnx": "demo"},
                       description = "HuggingFace BERT model fine-tuned with SQuAd and exported from PyTorch",
                       workspace = ws)
顯示您註冊的模型
您可以列出此工作區中註冊的所有模型。
models = ws.models
for name, m in models.items():
    print("Name:", name,"\tVersion:", m.version, "\tDescription:", m.description, m.tags)

#     # If you'd like to delete the models from workspace
#     model_to_delete = Model(ws, name)
#     model_to_delete.delete()
將模型和評分程式碼部署為 AzureML 端點
注意:Python SDK 的端點介面尚未公開發布,因此在本節中,我們將使用 Azure ML CLI。
yml 資料夾中有三個 YML 檔案
env.yml: 一個 conda 環境規範,將從其中生成端點的執行環境endpoint.yml: 端點規範,僅包含端點名稱和授權方法deployment.yml: 部署規範,其中包含評分程式碼、模型和環境的規範。您可以為每個端點建立多個部署,並將不同數量的流量路由到這些部署。對於本例,我們將只建立一個部署。
部署可能需要長達 15 分鐘。另請注意,筆記本所在目錄中的所有檔案都將上傳到構成端點基礎的 docker 容器中,包括 ONNX 模型的任何本地副本(該模型已在上一步中部署到 AzureML)。在建立端點之前,請刪除任何大型檔案的本地副本,以縮短部署時間。
az ml online-endpoint create --name question-answer-ort --file yml/endpoint.yml --subscription {ws.subscription_id} --resource-group {ws.resource_group} --workspace-name {ws.name}
az ml online-deployment create --endpoint-name question-answer-ort --name blue --file yml/deployment.yml --all-traffic --subscription {ws.subscription_id} --resource-group {ws.resource_group} --workspace-name {ws.name}
測試已部署的端點
以下命令執行已部署的問答模型。test-data.json 檔案中有一個測試問題。您可以編輯此檔案,輸入您自己的問題和上下文。
az ml online-endpoint invoke --name question-answer-ort --request-file test-data.json --subscription {ws.subscription_id} --resource-group {ws.resource_group} --workspace-name {ws.name}
如果您已經走到這一步,您就成功部署了一個使用 ONNX 模型回答問題的有效端點。
您可以提供自己的問題和上下文來回答問題!
清理 Azure 資源
以下命令刪除您已部署的 AzureML 端點。您可能還需要清理您的 AzureML 工作區、計算資源和已註冊的模型。
az ml online-endpoint delete --name question-answer-ort --yes --subscription {ws.subscription_id} --resource-group {ws.resource_group} --workspace-name {ws.name}